Pages

Grand Trunk Micro Camp Stool Review

The Grand Trunk camping stool is lightweight and collapsible making it ideal for hikers, campers, and motorcyclists. The stool is small enough to pack on your bike and big enough for a seat when needed. The seat area is 12.6 inches by 10.6 inches and sits at a height of 14.5 inches.


The nylon seat is tough enough for outdoors use and the mesh storage area under the seat is a convenient place to put glasses, a flashlight or anything else you want to keep close. The entire seat has a weight capacity of 250 pounds. 


The stool breaks down by removing the legs which are attached to the seat frame with shock cord, just like a tent. This also makes it fast and easy to set up. No tools are required to set up or break down the stool and when broken down, the entire stool goes into a storage bag. This compact package can fit in your saddlebag or backpack.


For motorcycle traveling the stool easily fits inside my Pelican 1450 case with some room to spare. It weighs just 22 ounces, making it lighter and easier to carry than a full sized folding chair on your bike.


I've used this stool on several moto-camping trips and I like that it's small, lightweight, easy to set up and take down. The four legs make it more stable and comfortable than those three legged stools. It's also less expensive than similar chairs on the market.


Most importantly, it keeps my butt out of the dirt and pine needles during my morning coffee and that makes for a good morning in the forest.

Wolfman Expedition Saddlebags

If you like the idea of soft luggage on the KLR, these Wolfman Expedition saddlebags are a good option. They are tough and will carry a lot of adventure gear or whatever you haul on your bike.


The Expedition saddlebags have been around for a while and have earned a great reputation. They are waterproof, durable and come in yellow or black. I like the yellow for greater visibility on the road.


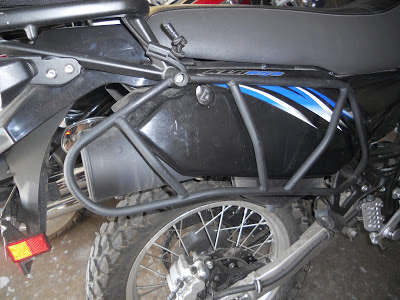
Wolfman devised the Universal Saddlebag Straps which allow you to mount these bags on many different types of racks. I use these Precision Motorcycle Racks and they work fine. Installing the bags is quick and easy.


The first step is to lay the bags across the bike. Then adjust the main straps so the bags hang at an even height on each side of the bike.


Next, each bag attaches to the side rack using the Universal Saddlebag Straps. There are four straps for each bag, two on the front and two on the rear. Above are the front attaching points on the right side bag.


This picture shows the two rear straps for the right side bag. These small straps work great for keeping the bag secure on the rack. Adding some gear inside the bag will provide some shape and make mounting them easier.   


My rain gear is stuffed in the bottom of this bag, and there is room for a lot more. Each bag has a 19 liter capacity. If you prefer to avoid metric conversions, just remember these bags hold a lot of gear when they are carefully packed.


With the bag packed, tighten the upper and lower horizontal straps across each bag. This pulls them tight against the racks where they will remain pretty secure.


The top of the bag rolls down and is secured with a vertical strap on the front and rear. Be sure to let the air out as you roll the top down.


Finally, this "V" strap threads from the back, through a front D ring and clips on the back side again. Pull this one tight to squash down the top of the bag and you are done. 


Before starting down the road it is good practice to double check all straps and ensure everything is secure. At the first stop, give the straps a tug to ensure all is well. A couple are normally a bit loose, but after the contents of the bags shift and settle down, the straps stay very secure. 

After the ride, the Expedition bags are easily removed and stored, or leave them mounted to provide your bike some extra hauling capacity. Their only drawback is the inability to lock, so don't leave any valuable art work in them when overnight parking on the street.

Coffee Fix When Camping in the Wild

I need my coffee in the morning and I want real coffee - not that freeze dried stuff. That is seldom possible when moto-camping, but these little VIA ready brew coffee packs from Starbucks are a good substitute. 


These single serving packets weigh nothing and take up no space in your luggage. But, on a chilly morning they will quickly and easily provide your morning coffee fix. Just heat up some water using a Jet-Boil or similar device and mix the coffee in your cup. The first time, I was a bit skeptical to say the least. I was expecting that freeze-dried taste, but after a sip I was a whole new man and happy that my camping coffee woes were no more.

Idaho Backcountry Discovery Route Revealed


The greatly anticipated 5th Backcountry Discovery Route was unveiled before a sold out auditorium in Boise last evening. The movie ran for about 90 minutes and was a big hit, based on the reaction of the 350 in attendance. People laughed in some places, cheered in others, and groaned when a couple of the riders went down. Along with DVDs of the new movie, the new Idaho BDR maps were for sale in the lobby. Those who waited to get them after the show were disappointed as both quickly sold out.


In a nutshell, the trail begins in Nevada just across the Idaho line and runs up through the Gem State before turning east into Montana on the Magruder corridor. The route then swings back into Idaho and north to finish at the Canadian border. The route runs over mountains, across rivers and through some of Idaho's most remote and beautiful back country. Anyone riding this route will not be disappointed by the scenery or the challenge of completing the ride.


After the movie, BDR riders Paul Guilliem from Touratech and Justin Bradshaw from Butler maps were on hand for a Q&A session. Someone asked why the Idaho route is repeatedly mentioned as the "least technical" of all the BDRs. Paul Guilliem explained the less technical aspect will allow more riders to participate in the BDR experience. I asked what suspension or other modifications were done to the bikes. The short answer was "none" these were stock BWMs and KTMs on the route. Honestly, I had not expected that answer since the bikes were fully loaded with panniers and soft luggage on some rough and rocky roads.


The final event for the evening was a drawing for a bunch of cool door prizes. As the table full of t-shirts, caps, and other freebies dwindled, I was stunned to hear my number called. I was stunned because I have never, ever, won a drawing of any sort. That changed tonight and I brought home an autographed copy of Into the Horizon by Lance Gines, who was on hand to present the book. Cool. Looks like I will be doing a book review sometime soon.


The IDBDR movie exceeded all of my expectations for the BDR series by once again showing great off road riding on a fantastic route. This BDR also highlights some Idaho history as well as many of the people and places worth visiting along the way. While no KLRs made the trip, our bike can handle the mountains, gravel switchbacks, and other challenges as well as the bigger, heavier, adventure bikes that appear in the movie.

Rider Saved By ATGATT

Nobody gets on their bike thinking, "Today I will have an accident, better wear my gear." Because accidents are never expected, many riders use All The Gear All The Time (ATGATT) as a personal rule for safe riding. You only ride when wearing a full set of safety gear. 

My friend Vic is an experienced rider on the street, trail, and track. He is also an ATGATT rider who high-sided on the pavement and walked away with minor injuries thanks to his safety gear. Here is his story...

"I just had a mini high side and tested out my spanking new jacket at about 35 mph or so.  Around Las Colinas City Hall, there is a area right around a curve where the inside lane has sunk down about 6 inches from the lane running beside it.  I did not notice this as I was changing from the inside to the outside lane.  I guess my tires hit the edge perfectly wrong with both tires and the bike suddenly pitched me over the bars sliding on my face and right side. One second I was riding along, the next second I was crashing into the pavement."


He compared this accident to hitting a curb sideways. As the bike fell away to the left, he flew over the handlebars and landed on his right thigh, then right elbow, and right front of his Shoei RF-1100 helmet. 


"My face slide jacked up my visor a bit but my helmet will be OK except for some minor scratching.  Right arm of the new jacket is chewed up a bit but not all the way through. Not a scratch on my legs thanks to Bull-It  jeans. My chest area is as if nothing happened thanks my Forcefield Body Armor." 

"If I was not wearing my gear, it could have been so much worse; cracked ribs, shoulder, smashed up face/jaw. Road rash on legs, shoulder, thigh, face, and arms would have been a reality."

This is a great testimony to the effectiveness of wearing quality gear. It will save you a lot of pain and injury and very possibly save your life when the unexpected happens.  Below is a more detailed breakdown of the damage to Vic's gear:

- Triumph branded jacket: (heavy leather with armored elbows and shoulders) scuffed, but no tears or asphalt burn through. 

- Gerbings T5 heated gloves: scuffing and tears on right hand fingers; repairable.

- Alpinestars MX5 boots: a few scrapes on the upper sliders, but otherwise fine.

- Bull-It Jeans: tear through of the jean material, but the Covec did not allow the asphalt to get to his legs. 


As for personal injuries:

"A 1/2 dollar sized asphalt burn on my right elbow area. quarter sized bruise on my right thumb and swelling of my right thigh. Some minor bumps and bruises. All should be fine."  

"I am in decent shape these days so I was able to easily get up, right the bike, and get back to work."

His trusty KLR returned him to work, but it also had some injuries.

"The KLR suffered some twisted forks (can fix, I think) and road rash on the ice-cream scoop protectors. Gotta love the old girl, she really came through like a champ. My S3 or Ninja would have been coming home on a truck."

It's easy to see that without his gear, Vic would have been a bloody mess laying along the road, while the bike was still good enough to ride. Only by wearing ATGATT, was he able to get up again with relatively minor injuries and ride away from this accident. That is something to remember the next time you get on your bike.

This is Vic's story and I hope this post will spare other riders from injury or death.  Being an ATGATT rider requires commitment. Putting on everything takes time, and on hot summer rides it can be uncomfortable. If one rider changes their mind and wears their gear after reading this, then our job here is done.

Thanks Vic and ride safe!

Wolfman E-12 Enduro Saddlebags Review


I bought the Wolfman E-12 Saddlebags to use on day trips with my Green DRZ. These are smaller saddlebags for enduro bikes, and they fit the KLX perfectly. They are quality bags, made of heavy duty material and zippers, and liked them right away. Just what I needed for overnighters on the KLX 400.


Yet, they have migrated over to the KLR and stayed there for several months. I don't plan on removing them anytime soon. These are great bags and I am amazed at how much they can hold. They will carry several plastic shopping bags of stuff, but are small and low profile enough to stay out of the way when not needed. Between errands and weekend rides, they have found a home on the KLR.


The above picture comes from Wolfman's installation sheet and shows why the E-12 bags don't require mounting racks. They lay across the seat with two adjustable 2 inch straps and the lower mounting straps fasten wherever needed. The "Tension-O-Matic Rear Mounting" strap was a pain and I removed it from the bags. Even without this rear harness the bags stay secure and ride just fine.


The bags are not waterproof, so I simply sprayed waterproofing on them. After several short trips through "normal" rain showers, nothing in them has ever been wet. Try riding long distance through heavy downpours or crossing a deep river, and your results may vary. A dry bag would be very useful in this situation. I did not buy them for that sort of riding so that's never been a problem for me. While I bought them for the smaller bike, they work great and look good on the KLR and I would buy them again. These bags are a quality solution for extra carrying capacity.

Idaho Backcountry Discovery Route Trailer


Less than one month remains until the new Idaho Backcountry Discovery Route will be revealed in Boise. I don't mind saying that I am excited and this video only adds to it. The trailer shows the great potential of the Idaho BDR and provides a glimpse of the awesome riding the new route will open for all dual sport and adventure riders. Regardless of your skill level, the challenge of the Idaho backcountry awaits!